Tuesday, November 3, 2009

Favorite Gear - Outdoor Research Chaos Jacket


A good puffy jacket is an essential piece of gear for mountaineering. Mine is kept in the top of my pack and goes on whenever I stop in cold weather and goes back in the pack once I start moving again. It’s also called upon to serve as an extra layer of warmth for unexpected storms or bivy’s.

Waterproofness is not usually a requirement for a puffy jacket because if it’s cold enough to need one any precipitation you might encounter will probably be in the form of snow rather than rain. The OR Chaos jacket has a water resistant shell that’s capable of shedding even warm slushy northwest snow. The filling is synthetic, which is my preference for use in the Cascades where it’s often wet. This works better than down which becomes a useless waterlogged sponge when wet.


There’s a large mesh pocket inside that’s sized to fit a 32oz Nalgene. This is great for keeping a waterbottle from freezing or defogging goggles. The fleece lined hand warmer pockets are cozy for warming bare hands.


My favorite feature of this jacket is the fit. The OR Chaos jacket was designed with climbers in mind, and as such is sized to fit a person with normal proportions, who happens to already be wearing climbing clothing.


In the past I’ve purchased jackets that were a size or two too big so that they would fit over my normal clothing. Typically the hoods are not large enough to accommodate a climbing helmet without stretching the jacket to the point you have to move your whole shoulders just to turn your head. The sleeves generally end up being a couple inches too long and the body often leaves me wondering who else I could get in the jacket with me.


When I put this jacket on over my normal fleece and Goretex the sleeves are just the right length, and there’s no extra maternity section in the front. The hood easily fits over a climbing helmet and still allows me to turn my head with normal motion.


The only downside I’ve found so far is that when I put this jacket on at rest breaks it’s often so cozy I just want to settle in for a long nap. : )

Summit Day Meal Plan

In town most of us are accustomed to eating three square meals a day. In the mountains sitting down for an hour to eat a big meal is not practical for several reasons:

• If the weather is nasty you will become uncomfortably cold if stopped for too long.
• On technical terrain there may not be a comfortable or safe place to stop.
• The gut-bomb that follows a big meal will impede your ability to keep going.
• You may not have time in your itinerary to cook or prepare food.
• Stoves and fresh ingredients are heavy.

I’ve developed a meal plan that I use for hard days that seems to work well for me. By “hard days” I'm referring to summit day or any day where I expect heavy exertion with few rest stops. This is all food that can be eaten on the go or during short breaks.

My standard summit day meal plan:
• Pemmican bar (400 cal)
• Two 5oz bottles of homemade gu (300 cal. each)
• 1000 cal. bottle
• Snack bags: one salty, one sweet (~500 cal. depending on what I put in these)
Total: 2500 calories

The snack bags serve to satisfy cravings if I get tired of eating liquid food. I find that having one bag of savory snacks and one bag of sweet snacks gives me options to suit my mood. Sesame sticks, Kettle Chips, Doritos, dried apricots, dried cranberries, Reese’s Pieces, and peanut M&M’s are some of my favorites.

In addition to the above trail food I’ll have a normal dinner in camp at the end of the day. I sometimes use Muscle Milk Collegiate mix as a recovery drink within the first hour of reaching camp. This is a high protein body building drink that helps muscles repair after a hard day. I’ll also have a good multivitamin some time during the day to make up for some of the vegetables I’m not eating.

Sunday, November 1, 2009

Pemmican Bar

Pemmican bars (a.k.a. Mealpack ® bars) are a high calorie energy bar. There’s ~400 caloies in each of these, which is more than some dehydrated backpacking meals and twice as much as the ubiquitous Cliff-Bar. They’re made of all natural ingredients with no preservatives.

I like to eat these for breakfast on the trail when I’m not up for preparing food. They are made by Bear Valley and can be purchased at REI or Whole Foods. My favorite flavor is the original Fruit ‘N Nut.

Favorite Gear - Osprey Atmos Series Packs


This is the most comfortable carrying pack I’ve owned to date. I own the 65 liter version which has a separate sleeping bag compartment in the bottom, and a secret zipper inside one of the outside pockets which allows you to access the main compartment without opening the lid.

The waist belt is nice and wide and conforms to the shape of your body so it distributes the weight well. This is the best fitting waist belt I’ve used. Other large packs I’ve worn rely on very thick dense padding, which leads to pressure points because it doesn’t conform well to your body. There are two mesh pouches on the waistband which are great for keeping snacks and other small items handy.

The mesh back is also nice for keeping your back cool in the summer. One thing I did not anticipate before I bought this pack is that the mesh back fills with snow if you use this pack in a blowing snowstorm. For technical terrain the durability of this mesh back would definitely be a problem. I’m sure it would not survive being drug up a cliff face on a haul line.

I don’t trust the bungees that are used to secure an ice-axe to the daisychain on the rear. I always clip a carabiner from the leash on my axe to the daisychain on the pack in case the bungees fail.

The curved frame makes these packs a challenge to pack, and limits the use of all available space, but they are light weight and carry very comfortably.

Homemade Gu Recipe

For on the go calorie replenishment and electrolyte replacement nothing beats the convenience of energy gels.

My homemade gu recipe is made of maltodextrin powder, Cytomax, and water. The commercially available equivalent most similar to this recipe is Hammer Gel. I’ve found that it’s easy and much less expensive to make my own.

Cytomax is a powder that’s mixed with water to make a sports drink similar to Gatorade. It comes in several flavors and is readily available at sporting goods and nutrition stores.

Maltodextrin powder is a powder that can be purchased in bulk online or at home-brew supply stores. It’s the main ingredient in many commercially made sports nutrition products such as energy gels or body-building drinks. It’s also used during the bottling process to add body to beer.

Maltodextrin powder is basically broken down corn starch that serves the body as ready to use carbohydrates requiring very little digestion, so it can be eaten on the go without causing an upset stomach.

To make the gu I put one scoop of Cytomax in a ½ cup measuring cup, then add maltodextrin powder to top it off. I then add this mixture to ½ cup of cold water and stir it until the powder is mostly dissolved. Finally, I pop this in the microwave for a few seconds and then stir to fully incorporate the maltodextrin. This makes exactly enough to fill one 5oz sport flask.

There are a couple options for carrying your gu. I use a Hammer Nutrition sports flask. There are several types of these available; I like the Hammer Flask the best because it has small ridges on it that make it easier to grip with gloves on. Another option is Cophlan’s squeeze tubes. Others have had good luck with these, but the idea of one of them popping open in my backpack and squirting sticky sweet syrup all over everything is too scary for me. I like a good solid plastic bottle with a screw on lid, although I still always carry them in an outside pocket of my pack just in case.

One flask of gu has about 300 calories. I usually try to consume one of these every hour for the first hour or two along with my water. After the first two hours I’ll switch to a different concoction which includes protein to prevent my muscles from digesting themselves—The 1000 calorie bottle.

1000 Calorie Bottle

What I call the 1000 calorie bottle is basically a Nalgene bottle filled with a beverage that provides about 1000 calories.

In a 32oz Nalgene bottle add:
29g maltodextrin powder
1 scoop Cytomax
1.3c soy protein powder
Fill the rest of the bottle with water

The mix dissolves best in cold water, but I find that even if it clumps up at first it will end up well mixed after shaking around in my pack for a while.

This mix is intended to provide carbohydrates from the Maltodextrin powder and electrolyte replenishment and flavor from the Cytomax. The soy protein helps prevent the body from harvesting protein from muscles during sustained activity. One bottle is adequate to cover about 4 hours of activity without additional caloric intake.

Favorite Gear - Jetboil PCS Stove


My trusty Jetboil has found a home in my pack as a light weight, versatile, convenient, fuel sipping cooking solution. This is the stove I find myself using most often.

There are better options for simmering or foods that require a skillet like pancakes, but for boil-in-a bag cooking, hot drinks, and even melting snow the Jetboil is fast, simple, and functional.

The small Jetboil fuel canisters fit inside the pot, but for economical reasons I prefer the standard large fuel canisters which have twice the fuel and only cost about $1 more. If you want to save weight or space the small canisters have enough fuel to last for a very long time.

This stove has rather poor stability, especially when using the small Jetboil fuel canisters. Like most backpacking stoves this one tends to turn into a ball of flames and shoots boiling water everywhere if you tip it over. The optional stability stand is really an essential if you don’t like this kind of excitement in camp. The stability stand is a small plastic tripod that snaps onto the bottom of the fuel canister to provide a stable base. In my opinion this should come standard with the stove. I know the Jetboil is popular to use as a hanging stove, perhaps this is how many users get around the stability problem. I’ve never found it necessary or convenient to hang mine.

I noticed on the REI website that they’ve just come out with a new version of this stove, the Jetboil Flash. This new version adds a translucent lid, and a “thermochromic temperature indicator” that makes it easier to tell when the water’s boiling without opening the lid.

This stove has always been targeted at the technosavy backpacker. Adding the term “thermocromic temperature indicator” to their marketing literature should definitely increase its appeal to this segment of the market. It also comes in cool new colors to appeal to those who are simply attracted to bright colors and shiny objects. : )

Links

-Weather Resources
Popular Northwest Weather Stations
Avalanche Center
Winds Aloft Forecast
Timberline Weather
Mt. Rainier Weather
Mt. Adams Climbing Conditions
Mt. Hood Climbing Conditions
Rainier Weather

-Trail/Climbing Route Resources
TrailsNW.com
Cooltrails
Oregonhiking.com
NWhiker.com
Cascade Climbers

-Trail Food/Nutrition
Freezerbag Cooking
Hammer Nutrition
Cytomax
Muscle Milk

-Other Blogs
Mount Rainier Climbing
Mike's Summits
Jess Climbing
Psychovertical
Glen Widener
Eric's Basecamp
Gearjunkie

-Local Organizations
Chemeketans
Mazamas
Santiam Alpine Club
Cragrats
Portland Mountain Rescue
Mount Hood Ski Patrol
Cascade Adventures
Pacific Northwest SAR
Multnomah County SAR

-Mountaineering Tips/Techniques
Mazamas Tip of the Week
U.S. Antarctic Program Field Manual
Psychovertical
Chemeketan's Climb School Manual
Santiam Alpine Club Climb School Manual
American Alpine Institute Tips

-Do-IT-Yourself UL Gear
Zen Stoves
Jason Klass' Homemade Backpacking Gear
Backpacking.net Make Your Own Gear

-Commercial Ultralight Gear
Antigravitygear
Six Moon Designs
Gossamergear
Integral Designs
Tarptent
Ula-equipment
Mountainlaureldesigns
Golite
Traildesigns
Bozeman Mountainworks
Simblissity
Backpackinglight

Brick And Mortar Stores
REI
Oregon Mountain Community
ClimbMax Mountaineering
Next Adventure

Online Retailers
GearEXPRESS
Steepandcheap

Backcountry
Backcountrygear
Sierra Trading Post
REI-Outlet

-Favorite Gear Shopping Resources
Black Diamond
Outdoor Research
Garmin

-First Aid
Outdoor Emergency Care
Wilderness First Responder
Mazamas Mountaineering First Aid

Friday, September 25, 2009

Mt. Cruiser - 9/13/09

This past weekend I headed out once again with the Mazamas, this time to climb Mount Cruiser in the Sawtooth range near Olympic National Park.

Our team gathered early Saturday morning at the leader’s house in Portland to carpool to the Staircase Ranger Station in Olympic National Park.
John, Mike, Kim, Jessica, & Chad at a rest stop about half way in

Upon registering at the ranger station we were told that we needed to be out by 6 p.m. Sunday. Apparently the area was being closed so they could replace the temporary patch with a permanent fix for a section of road that had been washed out.

We were told that our cars would be stuck in the parking lot once they tore out the temporary section and we might not be able to get them out for a week. This meant we were going to be very tight on time to reach the summit and hike all the way back out on Sunday, but no pressure. ; )

After gathering our gear we set out on the 8-mile hike in to Flapjack Lakes. Flapjack Lakes is a popular limited-use area equipped with bear wires, vault toilets, and is staffed by a wilderness ranger most weekends during the summer.
Flapjack lakes with Sawtooth in the background

The trail started out fairly mellow, but then we began to ascend the ~3,100’ in the last half. Somehow I managed to remain glued to the heels of Chad, who is a fit marathon runner, as he led our hike for most of the ascent. The exertion provided a good outlet for my masochistic tendencies.

During the hike in, leader John and I began talking about the Mazamas Advanced Rock class, which I took last summer. He asked if I would be interested in leading the 5th-class section that led to the summit on Sunday. It’s rare that I’ll turn down an opportunity to lead rock that’s within my ability, so I anxiously took him up on the offer.

We headed for the group campsite that we’d reserved at Flapjack Lakes, eager to set up camp and relax before our early rise Sunday for the climb. The campsite was vacant, with the exception of five tents belonging to a Boy Scout troop, so we headed down to the lake to hang out while we waited for their leader to return so we could sort out the campsite situation.

The resident ranger eventually rolled into camp and we were able to verify that there were other open campsites, so John graciously offered to let the Boy Scout troop remain in the group campsite. We also discussed the road closure situation a bit and determined that the work probably wouldn’t start until Monday morning, but that we should be out by at least 8 p.m. or we might get locked in.

We were off to a bit of a rough start with the surprise road closure and the campsite reservation debacle, but it all worked out. We decided to start a bit earlier than originally planned on Sunday to make sure we were out on time.

4:30 a.m. came way too early, but we had a deadline so we got moving fairly quickly. There’s a nice trail from Flapjack Lakes up to the base of Needle Pass where we left the beaten path to scramble up a loose rock-filled gully to the crest of the range. The going was a bit sketchy as the six of us made our way up to the pass trying not to send rocks down on each other.

Ascending the gully to Needle Pass

From Needle Pass we had to traverse the ridge crest over to the base of Mount Cruiser. There was a lot of exposed 4th-class scrambling and some route finding required to make our way across the ridge, which added to the adventure of this trip.

We dropped our packs at the base of a chimney leading up to a large platform at the base of Mount Cruiser. After mustering some courage we ascended this gully un-roped and squeezed through a small hole in the rock to gain the platform that would serve as our staging area for the technical portion of this climb.


Mike squeezing through the hole at the top of the chimney

As we waited for the rest of the group, Jess and I located the belay ledge and scouted the climbing route. Unfortunately, the climb began with a bulge just above the belay ledge which made it impossible to scout the route from the bottom.

Once John arrived he handed me “the rack”. I should mention that I had not planned to lead this until I was on the trail, so I didn’t bring any gear of my own that I would usually use for leading, I was in hiking boots, and I could hardly see any of the route I was about to climb. Fortunately I was feeling confident that day, so in my mind this added greatly to the adventure. “The rack” that John had brought consisted of 5 stoppers, 2 cams, 3 tri-cams, and not nearly enough carabiners and slings. For those of you reading this who are not climbers this is about ¼ of the gear I would usually carry up a climb like this at the crag, and about ½ what I would usually take in the mountains. I was a bit nervous about heading into the unknown being so sparsely equipped, but I knew that the rock was easy.

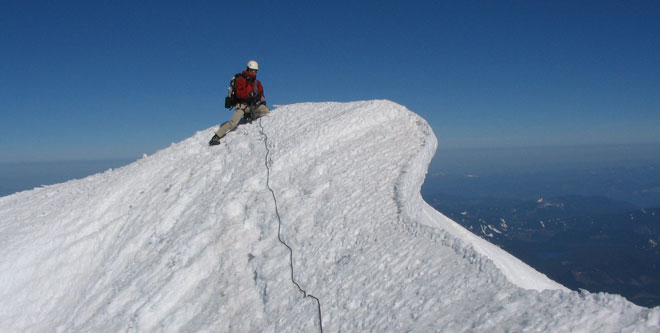
Once I started up the route I was glad to see that the climbing was easy so that I could focus on finding gear placements to protect my ascent. This turned out to be quite a challenge as the rock in this area has very few cracks. It took some significant creativity to complete the pitch with what I had on my harness. The guide book says this is a 70-foot pitch. What I discovered is that 70’ only gets you to a belay ledge from which you have to traverse across a very narrow exposed ridge to the summit. I knew nobody in our group would want to climb this un-roped and that belaying each other one at a time would take forever, so I clipped the belay anchor as I passed and pushed on to the summit where I was able to fix the end of the rope to a large horn. After completing the pitch and fixing the rope I had two carabiners left and zero slings. That’s as close as I’ve ever come to running out of gear on a route.

This is a photo of a private group of Mazamas who climbed the same route right after us

With a fixed line in place I called down to the rest of the group to head on up. We took turns on the small summit before rappelling back to the safety of the staging platform below. From here we rappelled back down through the keyhole and the chimney to our packs.

Descending the chimney back to our packs

We ended up setting about four fixed lines on our descent since down climbing this steep terrain was quite intimidating for all but the most experienced climbers. Although the rope provided much more safety it also tended to knock down a lot of loose rock as we rappelled down the loose gully from Needle Pass. Fortunately everyone made it down safely and we began the short jaunt back to camp before heading down the mountain.

Once in camp we refueled and packed up before heading for the cars. I burned down the trail like a horse headed back to the barn in an effort to hike out before darkness set in and the gate was locked. We managed to knock off the 8 miles back in less than 3 hours, which put us at the cars at 8 p.m. We quickly packed up and headed down the road hoping the gate had not yet been locked.

Fortunately the Rangers had left it partly open so we could get through. We stopped for burgers at a tavern in Hoodsport and then drove home. I arrived home exhausted after midnight.

I must say I wasn’t good for much at work the next day, but it was an awesome adventure and I’m glad we did it.

More photos of the climb, and another trip report from Jessica:
Jessica's Trip report
Jessica's Photos
Kim's Photos
Brad's Photos

Monday, August 24, 2009

Hardest Summit in Oregon - 8/22/09

Mount Jefferson is the second-highest peak in Oregon and has a reputation for being the most-difficult summit in the state. Certainly there are harder routes, but the easiest route on Jefferson is arguably more difficult than the easiest route on any of Oregon’s other volcanoes.

On Saturday I had the privilege of sitting on top of this prominent peak with views to the north of Hood, Adams, Rainier, and St. Helens. To the south we could see the Three Sisters, Broken Top, Mount Washington, Bachelor and Three-Fingered Jack.
Me on the summit

We set out Friday morning to hike into Shale Lake (el 5883’) where we set up camp prior to climbing the mountain on Saturday. The hike in from the Pamelia Lake trailhead was enjoyable in cool weather. The clouds burned off as we made our way up the 7.5-mile approach trail with an occasional light breeze to keep us cool.
Jefferson from our camp at Shale Lake

There was a lot of nervous energy around camp on Friday evening in anticipation of the long day ahead and the notoriously intimidating snow traverse that would be required to reach the summit block.

We heard from another Mazamas group that had climbed this route the weekend before that the traverse was in an exceptionally difficult condition. After hearing this I was mentally preparing myself to bail if the traverse looked too dangerous. This would have been a very difficult decision for me after so much work to get there, but I was determined to return home safe even if it meant not summiting.

We left camp at 1:45 a.m. to begin the tedious slog up the South Ridge. It was a moonless night, but the stars were out as we made our way up the ridge by headlamp. I saw several shooting stars and wished for favorable conditions that would lead to a safe summit and return trip.

Thanks to our trip leader Hugh’s amazing route finding in near total darkness we reached the notch adjacent to Red Saddle (el 10,200’) in 5 hours of climbing. Since we were on this route in late season there was no snow, which meant the entire South Ridge was boulders and scree, most of which we climbed in the dark.

Upon reaching the notch we got our first view of the dreaded traverse. After sizing up the route and determining it was doable I felt greatly relieved to realize I actually had a chance at summiting!

Our group headed over to Red Saddle to get ready while Hugh scrambled over to the snow to figure out the best way to safely navigate the steep snow. I joined him along with our assistant leader Greg to start setting up the anchors and put together a game plan. After getting an anchor setup I scrambled back to Red Saddle where I could wait safely out of the rock-fall zone while Hugh led the traverse and Greg belayed.
Hugh leading the traverse

Hugh completed the traverse and affixed the rope to a large boulder on the other side. With 6 pickets in between we had a fixed line that allowed the remainder of our party to cross the slope with reasonable protection.

One at a time we walked down from Red Saddle, put on crampons, and began the fixed line traverse. We opted to take a low line on the snow, which allowed us a shorter traverse before ascending straight up the steep snow to gain the ridge on the far side.

Water that melted during the day and ran off the snow field had frozen and turned to ice on the rocks below. This meant that we had feet on verglas and axes in snow.
Mark finishing the traverse

As I started across this portion of the traverse I regretted bringing my aluminum crampons. Making them work on the verglas was a delicate operation. I also longed for the security of an ice-tool in addition to my ice axe. I’ve learned from my experience in climbing that wishing for things you don’t have is a waste of energy, so I tried to push those thoughts out of my head and focus on the task at hand as I made my way across.
Three-Fingered Jack, Mount Washington, and Three Sisters in the distance

Soon all 6 of us were safely across and ready for the rock on the summit block. Though the climbing there is easy, the rock is loose and the exposure is great, so Hugh again setup a fixed line to protect the single rock pitch to the summit. Somehow we managed to get all 6 of our party on the tiny summit and record our names in the summit register, which we were surprised to find was chock-full of lady bugs!
An unlikely home

We then down climbed back to the traverse for round 2. By this time the sun was on the face so the snow was softer, but fortunately it was not yet too soft. There’s a fine line between snow that’s firm enough to provide purchase for crampons, ice axe and pickets and slush that’s difficult to navigate safely, so we wanted to get back across before it got too soft.

The ice that we had on the way up had now partially melted and mixed with the rock and dirt underneath to create a red mushy mess that was only marginally better than the ice, but I found it much more enjoyable to navigate with the confidence I had gained by crossing this slope earlier in the morning.

Our descent back to camp was long and tedious. We were headed downhill, but the sun was out now and was getting quite warm. After the long climb my feet were killing me. We made it back to camp 15 hours after we’d left. I’ve never been so anxious to get my boots off. I was extremely grateful that I’d brought along a pair of Crocs to wear as camp shoes. I went to bed early after soaking my feet in the lake and eating some dinner to refuel for the hike out Sunday morning.

I got up at 4:30 a.m. and cooked a big breakfast before packing up and hiking out the 7.5 miles back to our cars. It had been a great trip that ran smoothly from start to finish. This was one of the most difficult and memorable climbs I’ve done, so this summit came with a great feeling of accomplishment.

Wednesday, July 22, 2009

Ingalls Peak - 7/17/09

Ingalls Peak (North peak in middle)

Last Friday I climbed the South Ridge of North Ingalls Peak in the Mount Stuart range with the Mazamas. Kim and I drove up Thursday afternoon to camp near the trailhead where we met Hugh and Greg. I had never met any of them before, so it was nice having this opportunity to get acquainted before climbing the next day.

We were on the trail shortly after 5 a.m. Friday. The approach trail to Ingalls Pass was very nice. Upon arrival at the pass we were greeted by a heard of mountain goats and swarms of mosquitoes.

I’d never been this close to the mountain goats before. I wouldn’t say they were aggressive, but they definitely weren’t shy. They seemed to show no intention of yielding the trail and would follow us when we tried to go around. If we got too close they would let us know by making snorting and grunting sounds and pawing at the ground. This modest display of aggression would not have been quite as intimidating without the sharp horns on their heads.

We tried to give them as much space as possible, but they lingered in hopes one of us would stop to take a leak.

These goats crave salt and will get it any way they can, sucking on pack straps or lapping up urine. They reminded me a bit of the shape-shifting salt vampire from that old Star Trek episode.

It’s recommended that people pee on the rocks instead of on the dirt or on plants when in goat territory. This prevents the goats from tearing up the ground and plants.

Hugh attempted to become pee brothers with the goats but I don’t think the ceremony was complete, as Hugh never managed to drink any goat pee.

Salty yellow beverages

From the pass we proceeded across rock and snow fields to the base of the South Face.
The South Face

The slab that forms the South Face is a nice solid piece of rock with easy climbing and good cracks for protection. We climbed the route as two teams of two. I got to lead all three pitches on the second rope with Greg and had a blast! The sky was crystal clear, so we had great views of the surrounding peaks. 3 pitches up and 3 rappels down.

From the pass we proceeded across rock and snow fields to the base of the South Face.
Ingalls Lake

Looking down from top of pitch 2

Summit

Rappelling off the top

By climbing early on a Friday we managed to avoid the crowds for which this popular route is known. The first other climbers we saw were just gearing up at the base of the climb as we made our last rappel. Having the route to ourselves made me glad we climbed on a weekday.

The hike out was hot and the drive home long, but it was definitely worthwhile. I’m already scoping out peaks for another visit to this beautiful mountain range next summer.


Mount Stuart

Gear notes:

Required 2 ropes to rap the 2nd pitch
Used ~9 draws

Every anchor had bolts, slings, rap-rings
Used a #3 Camalot, but could have done without it

Wished I’d left the large hexes at home and brought cams in the .5-.75 Camalot range instead

Tri-cams took some fiddling to set properly in the smooth slippery cracks

Driving back to Portland through Yakima (~4 hrs) was faster than driving up through Olympia (~6 hrs)